Stephan vs. PrusaI3Mk2 vs. NinjaFlex
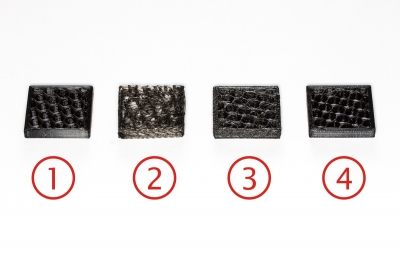
An ulterior motive when buying the 3D printer was the ability to print with a variety of materials, depending on the purpose. A filament with special properties is NinjaFlex with a Shore hardness of 85A very elastic and thus ideally suited for seals, rubber feet and so on. The fact that the material is compressible also makes the prcessing very delicate. Here are four samples and the story behind them:
Piece # 1 was printed normally with a standard Prusa I3 Mk2 at 225°C and is flawless. If it would be always so easy ... unfortunately it did not always work reliably and pushed out the filament laterally between extruder pinion and Hotend if too much pressure was applied. Too little pressure, and not enough material was conveyed, even at an reduced speed of 15 mm/s. That improved slightly after I changed the pressure part so that the axes of extruder and ball bearings were exactly at one level, there was a small offset in straight from the factory.
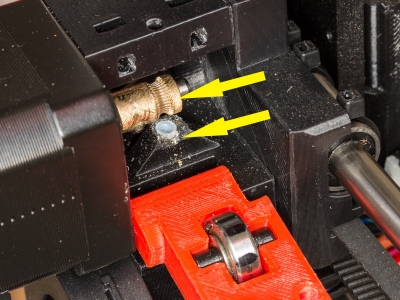
Now you do not print with the material every day, and my specimens suddenly looked like No. 2, no matter how I adjusted the spring tension. It was really desperate. On the other hand, solving such a tricky problem is an irresistible challenge for an INTJ. The first successful idea for troubleshooting was to attach markings to the ball bearing to see if it was spinning at all. Here was obvious that with too much pressure something stucks, but the maximum was not enough to print. Why ever it worked out before. A test with a laid inbetween paper strip showed that the ball bearing abutted the extruder as well as the sheath of the Bowden tube:
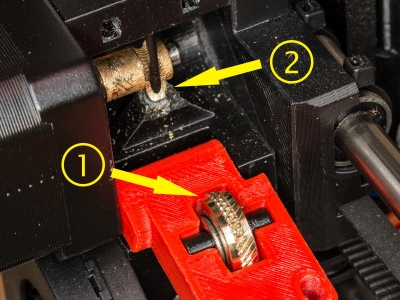
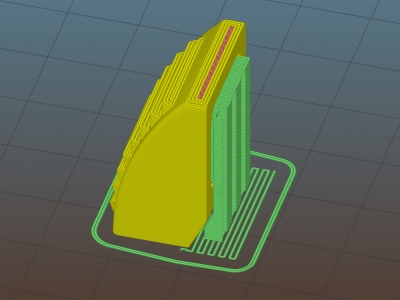
From the latter I could take away some material, on the first one only a new construction helped. A brass ring was pressed an a smaller, only 11mm large ball bearing which has in the middle a corrugation has which at the outer edges is turned off again (1). This allows more pressure without mechanical blockage.
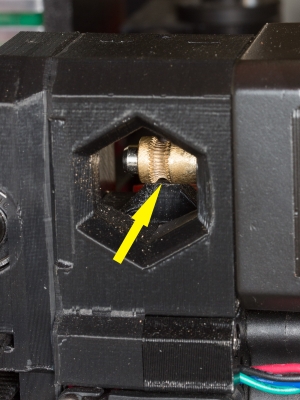
Unfortunately, then the material does not play along, it doesn't like to be put under pressure and evades sideways, even through the smallest gaps. Therefore, an additional guide was needed to prevent the escape to the side (2). In the picture is the fourth version and even these is not perfect because the way through the pinion groove forward is still possible. This is tiny, but the NinjaFlex squeezes through:
You suspect: despite all these improvements, I could only print the third test piece by raising the temperature to 250°C. The surface was anything but smooth. Now I had already tinkered a few evenings and was quite at the end of my nerves. Then I called a break and a few hours later, the magic of Introverted Intuition worked: is it possible that there is a connection between the rough printing surface and my problems? When loading the filament, the thread extruded also very shaky from the nozzle. With PLA, there was no problem because it was passed through the extruder without mercy, but if the nozzle is somewhat clogged by incrustations, it increases the resistance and is also the cause of the surface issues. So removing the nozzle and cleaning as much as possible, a combination of hot air blower for warming, a 2 mm drill for the inside, the acupuncture needle for the inner bore and a small gas burner for burning the remnants which did not want to melt. The result after assembly and recalibration is part 4. Finally it prints reliable! It does not reach the quality with the new nozzle to 100% (wear? 1)), but at least the puzzle was solved. The printed part also proved that NinjaFlex can be printed with support. The support can be easily ripped of, which is even easier than with PLA.
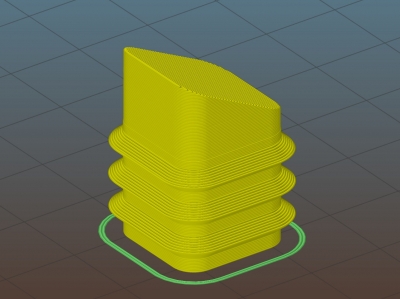
The whole thing becomes a base cap for a 20x20 mm square tube. The NinjaFlex part is the soft bottom and thus also slip-resistant. Also because of the shape I had to split the plug and print rotated by 90°, part 2 is then made of Flexfill98A, which is still elastic, but much stiffer. Due to the print orientation, the ribs can unfortunately only be made symmetrical, the overhang without support structure is limited to about 45-50°. The Flexfill98 is much easier to print and clamps well into the tube where the ribs are slightly compressed. The NinjaFlex cap is then glued to the angled end with Stabilit express.
Postscript: 1): As you can see in this Youtube video, is the cause of the not so smooth surface most likely the humidity of the filament, incorporated in the meantime.
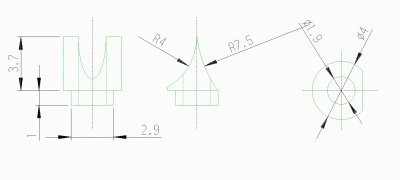
Postscript #2: I made a drawing for the brass filling part. The measurements are taken from my piece, but because the radiuses are rasped by hand it is not exact science. Ideally, on the side with r=4 mm there should be a bump where the groove in the pinion is. The shoulder fits into the bowden tube of the hotend. It doesn't have to be fixed because the friction between pinion and this part - brass on brass - is to low to be seized. For unloading the filament, you have to open idler and cut it off, because the blob at the end of the filament doesn't fit through the 1.9 mm hole.

Kommentare
Ansicht der Kommentare: Linear | Verschachtelt
Michael Hansen am :
Hi Stephan
I am very interested in more info about the brass filament insert that you have made (no 2 in one of the photos). Do you have a drawing of it or a better photo showing more details? How do you prevent this brass insert from moving up info the extruder pinion when extraction the filament?
/Michael
Stephan Brunker am :
Hello Michael, I have added a description of the piece.